Blog

  • Camping World’s Guide to RVing Everglades National Park

    Camping World’s Guide to RVing Everglades National Park


    Have you ever wondered what a subtropical wilderness looks like? It just so happens that Florida is home the largest one in the US.

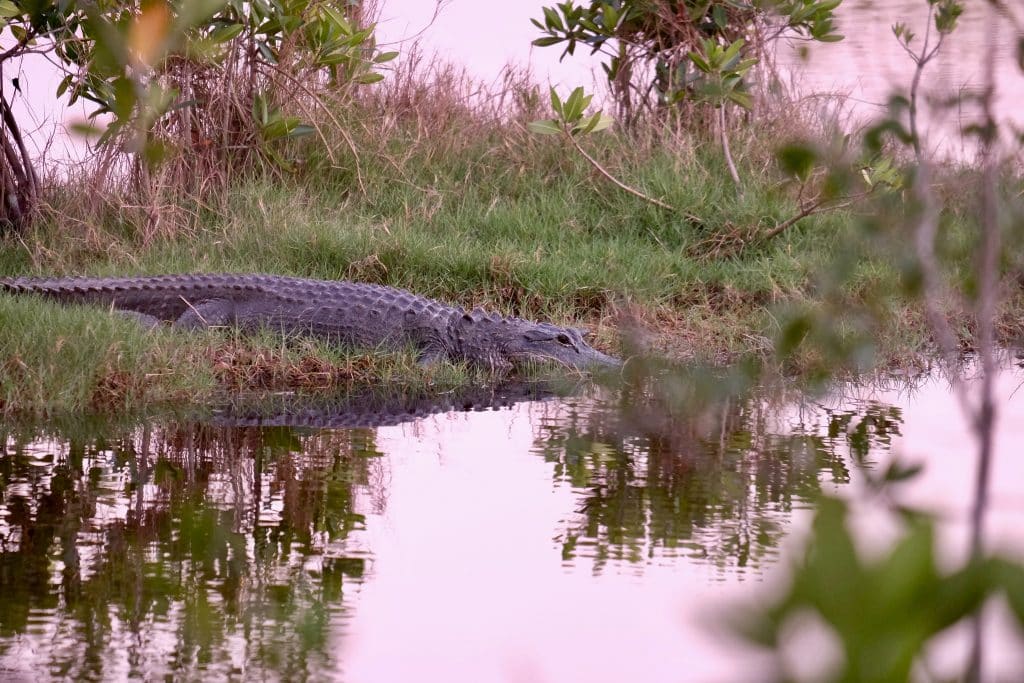
    Everglades National Park is home to one of the most unique and diverse ecosystems in the world. You’ll find a mix of Native American heritage and American settler history in this area. And it’s home to a special selection of native animals like the West Indian manatee and the American Crocodile.

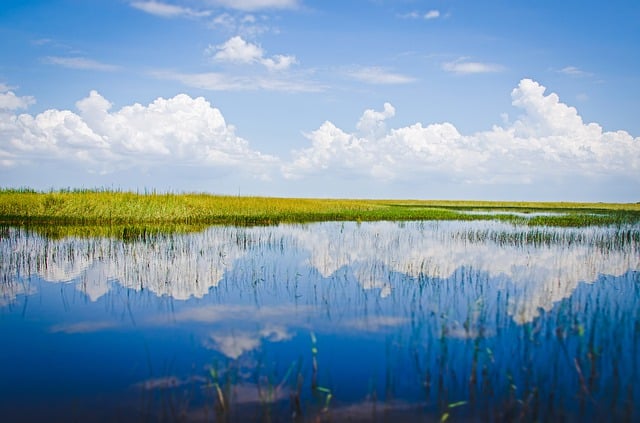
    This vast and beautiful wetland makes for a great photo op. But you’ll never understand it’s beauty until you visit it yourself. And what better way to visit the Everglades than in an RV?

    Keep reading for our complete guide to RVing Everglades National Park.

    History of Everglades National Park

    everglades national park

    For hundreds of years, the Everglades was home to a number of Native American tribes. The Calusa and the Seminole were two of the most dominant tribes.

    Soon after the Spanish arrived in the 16th century, the Calusa were quickly displaced from the region. Many were killed by European diseases. Some retreated further into the Everglades. And others fled to Cuba.

    In 1821, the US took control over Florida from the Spanish and began their war to drive the Seminoles out. But the Seminole people knew the region and the weather, so they had an advantage over the American soldiers. They were able to evade attacks by retreating into the deepest, mosquito-ridden parts of the Everglades.

    Eventually, the Seminoles were forced to sign a treaty where they gave up over 2 million acres of land. After the government gained full control over South Florida, they started an initiative to drain the swampy area. This created more land for agriculture and settlement.

    As early as the turn of the 20th century, Floridians began appealing for the conservation of the Everglades. By the time they established the park in 1947, drainage had taken a big toll on the Everglades ecosystem.

    Everglades National Park protects the remaining 20 percent of the original Everglades. By area, it’s the third-largest national park in the US, behind Death Valley and Yellowstone.

    Why Visit the Everglades in Your RV?

    The park covers 2,400 square miles. That’s a lot of ground to cover. Making the trip in your RV allows you to see more and do more while you’re visiting the park.

    This is one of the few parks that you can visit in the winter and still wear a t-shirt. There are so many outdoor activities to do. You’ll want to spend at least a few days at the park enjoying this beautiful landscape.

    Places To Go

    everglades national park

    There are four major areas in the park, each located near a park entrance. Visit these areas to find the bulk of the park hiking trails, campgrounds, and visitor centers.

    Shark Valley

    Shark Valley is near the Miami park entrance and it part of the heartland of the Everglades. Its namesake comes from the Shark River, where the waters of Shark Valley drain. There’s a 15-mile road loop where you can walk or ride a bike to a popular wildlife area. And they offer guided tram tours and an observation tower.

    Gulf Coast

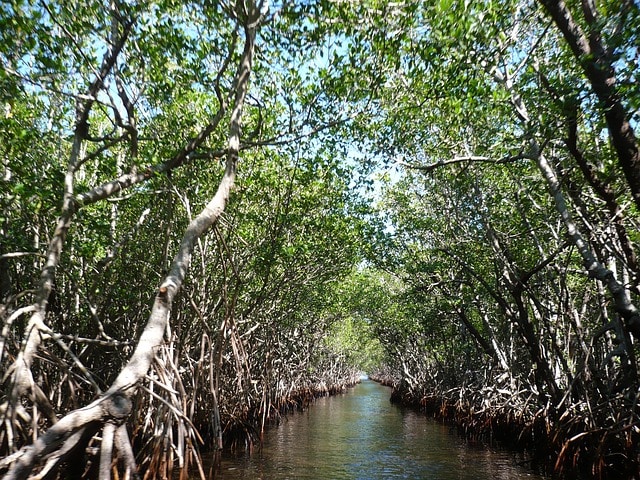
    The Ten Thousand Islands is a group of islands that are home to a large mangrove forest. You can access the islands at the Gulf Coast Visitor Center, but only by boat. They offer chartered boats or you can bring your own and explore the mangrove estuary.

    Royal Palm

    Royal Palm is near the town of Homestead and it houses the Ernest F. Coe Visitor Center. The main attraction here is the abundance of hiking trails. The Anhinga Trail and the Gumbo Limbo Trail both start here and are two of the most popular.

    Walking these trails, you’ll encounter the wildlife of Taylor Slough and the beautiful views of the hardwood hammocks. Hammocks are raised areas of land that form thousands of islands around the park. Large trees grow on the hammocks, and their canopies provide shade and protection for hundreds of animal species.

    Flamingo

    Flamingo is the park visitors center at the Homestead entrance. It’s a popular area because of its proximity to the mangrove waterways. You can canoe, kayak, or launch your boat from the marina to explore the mangroves. Flamingo also has a campground and plenty of hiking trails to enjoy.

    Things To Do

    everglades national park

    If you love the outdoors, the Everglades has something for you. It’s the perfect family destination because of the rich cultural history and the abundance of outdoor activities.

    Boating

    The Everglades is a popular boating destination. In fact, most of the park is only accessible by boat. There’s a marina located in the Flamingo area. It’s open year-round with an onsite store and space for up to 50 boats. There are multiple boat docks throughout the park where you can drop your boat and park your vehicle. Plus, there are plenty of guided boat tours if you’d prefer that someone else do the driving.

    Kayaking and Canoeing

    Paddling in the Everglades is a wonderful way to explore the backcountry without disturbing the habitat. At Flamingo, you’ll find several canoe trails that lead you deep into the mangroves. There are trails for all, from skilled paddlers to beginners. Rent your canoe or kayak at Flamingo or Gulf Coast. Or bring your own rig and plan a multi-day backwoods paddling camp trip.

    Camping

    The warm climate makes the Everglades a great spot for camping year round. There are two drive-in campgrounds in the park. Long Pine Key Campground and Flamingo Campground both offer sites for tent and RV camping.

    In addition to the campgrounds, the park has plenty of backcountry camping opportunities for tent campers. Most of these areas can only be reached by water. But they’re worth the effort. There are plenty of beach camping spots available if you’re willing to pack up your kayak and paddle there.

    Fishing

    In Florida, you get the best of both fishing worlds: freshwater and saltwater. Fish for snapper or redfish out on Florida Bay or in the Ten Thousand Islands area.

    Freshwater fishing is more limited, so check with park rangers to find the best spots for bass and bluegill in the park. You’ll need separate fishing licenses for saltwater and freshwater fishing. And it’s important to remember manatee etiquette when fishing in the park. Idle your boat when you’re in manatee areas and never harass the animals.

    Hiking and Slogging

    There are miles and miles of trails to explore on foot when you visit the park. Each of the major park areas has many hiking trails. They range from beginner to difficult. Several of the trails in the Pine Island area have paved or boardwalk surfaces, making them great for short, fun hikes.

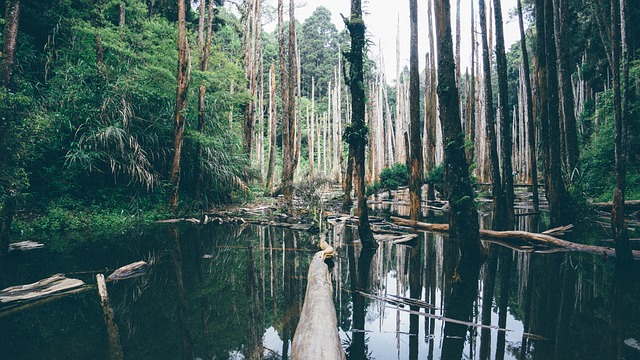
    If you’ve never heard of slough slogging, now’s the time to learn! The park offers you a once-in-a-lifetime experience to slog through the River of Grass. This means you’ll have to get your feet wet, but it’s worth it because you’ll get to experience the beautiful cypress domes. Slogging requires reservations.

    Always prepare when hiking in the Everglades. It gets very hot, very sunny, and very buggy during the summer. Bring long sleeves, sunscreen, bug repellant, and a hat along with you.

    When to Visit the Everglades

    everglades national park

    The Everglades is beautiful year-round, but there are better times of year to visit. If you can, avoid the rainy season (June-November). The park experiences regular rainfall during this time and it can put a wrench in your plans for outdoor activities.

    This is also the time of year for hurricanes. Although most hurricanes hit during August and September, they can hit any time during the summer or fall. Keep this in mind when you’re planning.

    The best time of year to visit the park is during the winter. The temperatures are cooler, but not cold. You’ll avoid most of the mosquito rush if you opt to visit then.

    Where RVers Can Stay

    The two campsites inside the park, Long Pine Key and Flamingo, both accommodate RVs of various lengths. They book up fast, so make your reservation in advance.

    No worries though if they are booked up, there are plenty of RV sites available in private campgrounds outside the park. Small towns dot the perimeter of the park and you’re sure to find some fabulous campsites within a few miles of the park entrances.

    Getting To and Around the Everglades

    everglades national park

    The park doesn’t have many roads. If you have a boat or a kayak, you can reach a lot more places. All of the major areas are accessible in your RV through the road system.

    From Homestead, FL, it’s just a few miles on Ingraham Highway to reach the Homestead Entrance. From there, you can visit the Ernest F. Coe Visitor Center and the Royal Palm Visitor Center.

    From Miami, take Highway 41 (Tamiami Trail) straight west to the Shark Valley Entrance Station and Visitor Center. The Tamiami Trail goes all the way through the park and up the western side of the state to Naples. Exit on County Road 29 to go down to Everglades City which is where you’ll find the Gulf Coast Marina area.

    Take the main park road down from Homestead or the Wilderness Waterway from Gulf Coast to visit the Flamingo area in the southern tip of the park.

    There’s something for everyone at Everglades National Park. Bring your RV down to the Sunshine State to explore this beautiful scenery and delicate ecosystem. Check out the park website to learn more.


    Is Everglades National Park on your list of places to visit? Tell us why or why not in a comment below!


    Source link

  • Labor Day Camping Cookout Recipes

    Labor Day Camping Cookout Recipes


    Nothing says Labor Day like taking one last camping trip before school starts and enjoying a terrific cookout. This year you can wow your family and friends with these easy, yet flavorful take on traditional favorites.

    To make things easier at the campsite, there are notes in each recipe for things that can be prepared before leaving home to make meal prep simpler at the campground.

    Chicken Kabobs

    Chicken kabobs on a charcoal grill.
    Image by Evan Wise from Unsplash

    Chicken is one of the easiest things to grill at the campground and these kabobs cook quickly and evenly. Just a little marinade you can prepare in advance is all that is needed to make them a hit with the whole family.

    Ingredients

    • 1/4 cup balsamic vinegar
    • 3 tbsp extra-virgin olive oil
    • 2 tbsp brown sugar
    • 3 cloves garlic, minced
    • 1 tsp dried thyme
    • 1 tsp dried rosemary
    • Salt & pepper
    • 1 red bell pepper, cut into 1” pieces
    • 1 zucchini cut into 1” pieces
    • 4 chicken breasts, cubed

     Directions

    Before you leave home:

    1. Whisk together balsamic vinegar, olive oil, brown sugar, garlic, and dried herbs, and season generously with salt and pepper. Reserve ¼ cup in a small container.
    2. Add chicken to the bowl and toss to combine. Store in a plastic container or large zip lock bags.
    3. Pack the chicken and small container of the extra marinade in your RV refrigerator.

    At the campground:

    1. Preheat grill to medium-high.
    2. Thread the chicken and vegetables onto the skewers.
    3. Cook for 5-7 minutes on each side or until chicken is cooked through.
    4. Baste with reserved marinade as needed.
    5. Let rest for 5 minutes before serving.

    Serve with this terrific pesto pasta salad.

    Pesto Pasta Salad

    Pesto Pasta Salad served on a white plate.
    Image by Eaters Collective from Unsplash

    This pasta salad includes fresh mozzarella cheese, black olives, and sun-dried tomatoes tossed with fresh basil pesto to create the perfect side dish. You can even make it the main dish by adding shrimp or cubed salami.

    Ingredients

    • 12 ounces bowtie pasta
    • 1 cup prepared basil pesto
    • 1 1/2 cups cherry tomatoes, cut in half
    • 1 1/2 cups fresh mozzarella balls, cut in half
    • 1/2 cup black olives, pitted and cut in half

    Directions

    This entire recipe can be prepared before you leave home.

    • Boil the pasta in salted water according to package directions.
    • Drain the pasta and cool in with water.
    • Place the pasta in a large bowl along with the cherry tomatoes, mozzarella balls, and olives.
    • Pour the pesto over the top and toss to coat evenly.

    Southwest Burger

    Southwest cheeseburger
    Image by Louis Hansel from Unsplash

    Hamburgers are an iconic staple of the holiday cookout. Spice up your traditional burger with cumin and jalapenos to create a sensational Southwest spin. Top with slices of fresh avocado and serve with the Sweet & Spicy Pasta Salad below.

    Ingredients

    • 1 1/2 pounds ground chuck
    • 1/4 cup finely chopped onion
    • 1/2 to teaspoon chopped jalapeno pepper
    • 3/4 teaspoon ground cumin
    • 1/4 teaspoon salt
    • 1/4 teaspoon pepper
    • 1 avocado, peeled and sliced
    • 1 lemon (or lime)
    • Tomato, sliced
    • 4 hamburger buns

    Directions

    Before you leave home:

    1. Combine ground chuck, salt, and pepper in a medium mixing bowl.
    2. Add chopped onion, jalapenos, and cumin.
    3. Shape the mixture into four patties, each 3/4-inch thick in the center and at the edges. Store in a plastic container or zip lock baggies.
    4. Slice tomatoes and store in an airtight container or zip lock baggies.

    Note: If the kids won’t like the extra spice, make a few using step 1 only.

    At the campground:

    1. Place the patties on the grill. Grill for 7 to 10 minutes per side, turning once.
    2. Slice the avocado and drizzle with a bit of lime (or lemon) juice.
    3. Remove the burgers from the grill.
    4. Serve with tomato and slices of ripe avocado.

    Sweet & Spicy Pasta Salad

    This pasta salad is packed with flavor! It is the perfect complement to Southwest burgers.

    Ingredients

    • 1 pound ditalini pasta
    • 1 pint cherry tomatoes, halved
    • 1 cup sliced drained banana peppers
    • 1 avocado, thinly sliced.
    • 2 tablespoons minced fresh chives
    • Sweet & Spicy Vinaigrette, recipe follows

    Sweet & Spicy Sauce

    • 1/2 cup red wine vinegar
    • 1/4 cup olive oil
    • 2 tbsp honey
    • 2 tbsp chipotle peppers in adobo
    • 1 tbsp Dijon mustard
    • 2 tbsp mayonnaise
    • 1 tsp dried Italian seasoning
    • 1 clove garlic, minced

    Directions

    This entire dish can be prepared at home.

    1. Cook the pasta in boiling water according to the package instructions.
    2. Drain, cool with water, and transfer to a large bowl.
    3. In a separate mixing bowl, prepare the sauce by mixing the ingredients in a blender or food processor.
    4. Pour the sauce over the pasta and toss.
    5. Refrigerate until ready to serve.

    Garlic Herb Grilled Potatoes

    These potatoes are even better than French fries. No oil is required, and the foil packet makes clean up a breeze. Cooking them on the grill or the oven will give them just the right amount of crispness.

    Ingredients

    • 2 lbs large Yukon Gold or other yellow-fleshed potatoes
    • 1/4 cup chopped mixed herbs (parsley, chives, rosemary, and oregano)
    • 2 garlic cloves, minced
    • 1/3 cup olive oil
    • 1 lemon wedge

    Directions

    Before you leave home:

    1. Cut potatoes into 1/2-inch-thick slices and cook in a large pot of well-salted boiling water 10 minutes (potatoes will not be cooked through).
    2. Meanwhile, stir together herbs, garlic, oil, 1/2 teaspoon salt, and 1/4 teaspoon pepper.
    3. Combine potatoes and herbs in a large bowl.
    4. Arrange the potatoes on a large piece of foil and fold the edges to make a packet.

    At the campground:

    1. Place the packets on the grill and cover. Cook for about 20 to 25 minutes, or until potatoes are tender.
    2. Take off the grill and serve.
    3. No room on the grill? No worries. The potato packets can also be prepared in the oven at 425F for about 15 to 20 minutes.

    Grilled Salmon

    Grilled salmon fillets
    Image by Alice Pasqual from Unsplash

    Grilled salmon is perfect for a family cookout. It is easy, fast, and flavorful. Serve this with the rainbow coleslaw.

    Ingredients

    • 4 skin-on* salmon fillets about 1-inch thick
    • 2 tablespoons olive oil
    • Salt & pepper
    • 1 lime cut into wedges

    Note: It is important to buy the fillets with the skin on to act as a buffer between the grill and tender fish while cooking.

    Directions

    1. Coat the flesh side of the salmon fillets with oil and season with salt and pepper.
    2. Grill the skin side down for about 6-8 minutes or until the fish lightens in color. You should be able to lift the fillets off the grill without them sticking.
    3. Flip the salmon and cook for just another 2-4 minutes.
    4. Remove the salmon skin from the salmon fillets.
    5. Serve with lime wedges.

    Rainbow Coleslaw

    Made without mayonnaise, this coleslaw is perfect for hot summer days. While you can prepare it ahead of time, I suggest you don’t mix the sauce and cabbage until just before serving.

    Ingredients

    • 1/4 medium green cabbage shredded
    • 1/4 medium red cabbage shredded
    • 1/2 cup shredded carrots
    • 6 scallions chopped
    • 1 1/2 tablespoons lemon or lime juice
    • 2 1/2 tablespoons orange juice
    • 2 tablespoons of rice wine vinegar
    • 1/4 cup extra olive oil
    • 1 tbsp honey

    Directions

    Before you leave home:

    1. Chop cabbage, cilantro, and scallions.
    2. Shred carrots.
    3. Combine juices, vinegar, olive oil, and honey. Store in an airtight container.

    At the campground:

    1. Toss all ingredients and serve.

    Hopefully, these recipes will help you have a wonderful Labor Day weekend!


    What are you doing for Labor Day? Leave a comment below.


    Source link

  • Private RV Rental – Savings Worth the Effort

    Private RV Rental – Savings Worth the Effort

    Have you been thinking about renting an RV for your next vacation? Of course, several big company names come to mind immediately and their phone numbers are easy enough to find if the jingle didn’t stick, but there is an insider secret that the highly experienced RVer may know that you don’t: You can save hundreds to even a thousand dollars, in some cases, per week and get twice the value of the unit by renting from private owners. Of course, everything has its pros and cons and is subject to personal opinion and bias, but here are some things to think about.

    Pros:

    Quality. First of all, make sure you understand the differences between Class A (looks like a bus), Class C (more like a camper), Class B (the size of a large van) and, of course, pull-behinds and 5th wheels which are towed instead of driven. Many companies specialize in one type and Class A’s are at the top of the quality scale. An owner of a $100,000+ motor vehicle is highly likely to take excellent care and give special attention to his or her RV. Renters of a privately-owned motorhome are also usually better scrutinized and are more respectful of the property they are renting so the unit itself is usually well cared for.

    Over my head in overhead. Of course, everyone knows that companies have overhead costs to cover. Private owners are much more likely to offer considerably discounted rates for your rental, simply because they can!

    Fees, fees and a few more fees! The big companies love them so much that sometimes they don’t even tell you about them until you’re picking up the keys. This is a common complaint in the industry. When comparing prices, always ask about Prep Fees, Cleaning Fees, Camping Kit Fees, and Dump Fees. Most private owners don’t charge them. This alone can save you $400-$500 on your rental.

    Cons:

    One thing that does represent a legitimate concern is breakdowns. Many of the well-known RV rental companies are able to offer free road-side assistance (or RSA) should the vehicle become disabled. Individual owners are not able to offer a free road-side assistance program along with the RV because, except on a “fleet policy”, RSA programs are issued in an individual’s name, not in the vehicle’s name. You can turn this into a positive by using a portion of the savings to purchase an RSA program from a company that specializes in RV services. For about $100, Good Sam’s offers a one-year RSA program that will cover the RV while you are on vacation and then covers you and your spouse (and all children living in your household) on anything you drive for the rest of the year (even if you’re driving a friend’s car!) It would also cover any other RV you rent during the 1-year membership.

    Unscrupulous Owner-Renters. This is the tough one. As in all things money, caveat emptor (buyer beware) and make sure you get a signed Rental Agreement AND read it. Do a little research, ask for some references and follow your instincts. An online search of the owner’s name or the unit information is likely to reveal any disputes in which the owner has been involved. The fact is that most owners are highly respectable, moderate- to upper-income-level executives and business owners who are merely interested in a win-win situation.

    So, do a little homework and you are likely to enjoy your vacation, save a chunk of your change for souvenirs and make some new friends, at no extra charge.

    Start your RV RENTAL Search HERE

    Source by Susan Coryell

  • How to Paint RV Cabinets

    How to Paint RV Cabinets


    Adding a new coat of paint to even a small portion of your RV can go a long way. Painting the inside of your RV can make it feel more like home and brighten up the space.

    While the idea of repainting all of the interior walls of your RV may sound exhausting and terrifying, painting the cabinets might sound a little bit more manageable. And guess what, it is! If you are looking to freshen up your home on wheels by repainting cabinets in the kitchen, living area, bathroom, or all of the above, here are some simple steps to follow:

    Remove Doors, Drawers, and Hardware

    Before any painting begins, remove all cabinet doors, drawers, and hardware such as hinges. These items are easier to paint properly when not in and/or attached to your cabinets and will make the painting of the actual cabinets a lot easier.

    Consider relocating doors and cabinets to a large space such as a garage where you’ll be able to set up your painting workshop and knock that part of the job. Ideally, you’ll have space where all cabinets and drawers can be laid out and worked on simultaneously but if not, work in batches or one at a time.

    Make sure you have a flat place to keep cabinets doors while you are working on them. Painter’s triangles on a garage floor or multiple sawhorses are an idea. Also, make sure you label any pieces that come off your cabinets. This includes all doors and hardware. This will make life much easier when the job is done!

    Preparation

    Proper preparation before you starting painting is key to a job well done. First, you’ll want to make make sure all cabinets, doors, and drawers are clean.

    Using something like Krud Kutter is a great way to remove dirt and grease. The next step in preparing your cabinets for paint is sanding. A thorough sanding will remove any old gloss, giving your new paint and primer something to stick to. An electric sander will get the job done quickly.

    The last step in preparing your RV cabinets for paint is primer. You may think a good sanding will allow you to skip priming, but again, proper preparation is the best way to get the results you are looking for!

    Painting

    DIY, Home Improvement, Renovation, Paint Roller, Wall - Building Feature
    Image by sefa ozel from Getty

    It’s finally time to paint. To avoid brush strokes, use a roller when possible on the doors, drawers, and cabinet frames. If you have access to a paint spray gun, even better!

    A small brush might be needed for any molding on cabinet doors our around the frames. Avoid using too much paint as that can cause drips. After the first coat is done, wait, then follow the manufacturer’s directions on the paint can.

    Generally, at least two coasts with a sanding in between will be needed. No matter what, don’t rush the process. Let the paint sit for more than enough time between coats.

    Finishing Up

    Once your final coat has had time cure, you can start putting your masterpiece back together again. Curing usually takes several days, so again, don’t rush the process!

    Once you are sure all paint is hard, reapply hardware and consider using felt pads on cabinet doors to avoid banging and chipping paint. Now take a moment to step back, take it all in, and touch up any places that need some extra attention.

    While the process of painting your RV cabinets may seem tedious and complicated, the end result is well worth the time and work you put in. While you’re at it, pick up some new hardware to make your RV cabinets, even more, your own, unique style.

    You will feel so happy and proud every time you step foot in your RV and see how your hard work completely changed the look and feel of your space.


    Do you have anything you think should be added? Leave a comment below!


    Source link

  • Renting an RV – 10 Things You Need to Know

    Renting an RV – 10 Things You Need to Know

    Renting an RV is the best way to explore Canada and United States. It is possible to rent an RV year round, for a day, week, month or even longer. If you are planning to rent an RV the following are ten things you need to know:

    1. Choosing the Size and Type of RV

    There are several different RV types. The most common is the motorhome, generally speaking, the larger the unit, the more space, privacy and comfort it will afford its guests. If you are planning to stay at one place for a long time and would like some luxury it would be a good idea to rent a Fifth Wheel. This will enable you to park your trailer and have the ability to use the truck for daily excursions. If you are planning to move around, drive on rougher roads or are travelling in Northern Canada or Alaska a camper would be a great choice. Your decision will depend on how many people are travelling, where you will be going and also your budget. Take your time deciding because your choice may make your holidays the most memorable ever or you will be so miserable you will never want to look at another RV again. Once you know which unit you would like to rent, visit your chosen RV rental office and check out the motorhome or trailer to make sure it will meet your expectations.

    2. RV Rental Companies

    Shop around, shop around, shop around. Check out as many rental companies as possible. When looking at prices make note of what is included in the daily, weekly or even monthly price. Some rental companies may have packages that include all mileage, kitchen kits and insurance. The only thing you have to pay for is gas. Others may give you a daily rate that includes just that, the daily rate. You will have to pay more for everything else. Take your time calculating all aspects of the rental price. Also, it doesn’t hurt to haggle the price, you may be able to get a better deal than listed especially if you are traveling during low season.

    3. Reserving Early

    If you are traveling during high season and you know which RV or trailer you would like to rent it is a good idea to book your RV early. You will be able to secure the RV you want and you may even get a better deal. Many companies offer discounts for reserving a few months ahead of your travel date.

    4. Basic Set Up

    When you are going over the RV features and basic set up make sure you check the leveling system and gauges. Gate valves for emptying grey and black tanks should close all the way and work smoothly without sticking. You don’t want to be splashed by a bit of sewage when the dust cap is take off. Adjust mirrors to needed position and check to see if they are firmly mounted and that they can be adjusted to needed position. Make sure everything is in proper working condition.

    5. Insurance

    RV rental companies are specialists in the business and offer reasonably priced, comprehensive insurance plans. Purchasing insurance coverage is a good idea and will help ease any concerns about driving an expensive motorhome or tailer. A second option may be auto insurance, speak to your insurance agent to find out if you are covered for the motorhome you want to rent.

    6. Being Safe on the Road

    Pick up your RV early. Drive it around a few blocks and test all the features yourself. You could come across a problem the mechanics may have missed. If this is the case you still have time to swap the motorhome for a new one instead of finding out 300 miles into your trip.

    7. Kits

    There are many different types of kits depending on the rental company you choose. They could be called by any one of these names; housekeeping kits, kitchen kits, personal convenience kits, vehicle supply kits among others. If you are flying to a city where you will be renting an rv and the only items you are bringing with you is your camera, personal items and clothes make sure you purchase all the necessary kits. Some rental companies may even supply a flashlight and axe for the campfire. They may also rent camping chairs, barbecues, bicycles, TV, DVD and other items to add to your fun.

    8. Campgrounds and RV Parks

    Canadian and US campgrounds offer camp sites ranging from back-to-nature basics in a wilderness setting, full facility campgrounds for RVs, quiet scenic camping sites, or RV parks with full resort facilities and amenities for families with children. When selecting an RV campground, it is important to plan ahead. Otherwise, you could arrive at your destination, only to find no place to stay. During peak season it is rare to find a campground without reserving. It is a good idea to purchase a couple of campground guides. They will give you information about fees and facilities.

    9. Alternative Transportation

    Unless you are pulling a trailer that you can unhook from your car you may need to plan for another way of getting around when you finally arrive at your destination. It may be enough to pack a couple of bicycles, there are moreand more foldable bikes on the market that are comparable to regular bikes. They are easy to store and fun to ride. A lot of experienced motorhome travelers tow a small car or bring along a small motorized scooter. Enjoyment of your vacation may depend on how you handle transportation needs once you park your motorhome at a campground or rv park.

    10. Secure your Load

    Make sure everything in your trailer is put away in cabinets and whatever is not in cabinets is safely tied down so it can’t move. Checking the fridge is a good idea to make sure there is nothing that will spill or be thrown around during the trip. You wouldn’t want to get to your destination and find a fridge full of broken eggs or spilled milk. Not a fun way to start your trip.

    Happy Travels!!

    Start your RV RENTAL Search HERE

    Source by Erika Widmer

  • Try This Shredded Chicken Tacos Recipe in an Instant Pot or Slow Cooker

    Try This Shredded Chicken Tacos Recipe in an Instant Pot or Slow Cooker


    Cooking in an RV can quickly get complicated. There’s not a ton of room to store ingredients, usually not a lot of counter space to prepare food, and after a day of adventuring or driving you want something that’s easy to make.

    This recipe is a great solution to all of those potential problems – it’s four ingredients (plus whatever toppings you want) and made in an instant pot or crock pot so you can turn it on and walk away. If you’re looking for an easy, family favorite recipe this flavorful shredded chicken dish is the perfect base for tacos, burritos, nachos, or quesadillas.

    chicken tacos from Instant Pot
    Image by author

    It’s simple to make, so you can spend more time enjoying the outdoors with your family and less time wondering how on earth you’re going to cook anything in that tiny oven.

    See below for both Instant Pot and slow cooker instructions.

    Ingredients for shredded chicken:

    • 3-4 boneless, skinless chicken breasts
    • 1 packet taco seasoning
    • 1 can chicken broth
    • 1 can fire roasted diced tomatoes

    Optional ingredients for taco toppings:

    • Tortillas
    • Cilantro
    • Avocado
    • Cheese
    • Salsa
    • Limes
    • Chopped red onion

    Equipment:

    Instant Pot or slow cooker
    Cutting Board and 2 forks to shred the chicken

    Instant Pot Instructions:

    Arrange the chicken breasts in the bottom of the Instant Pot and pour the can of diced tomatoes over the top. No need to drain the can. Mix the taco seasoning with the chicken broth. I find that if you put the seasoning in the pot directly it’s more likely to stick to the bottom and give you the dreaded burn alert. Mixing it into the chicken broth helps the seasoning to disperse and avoid burning.

    Set the Instant Pot to High Pressure for 20 minutes with the vent sealed. It will take some time for the pot to come up to pressure and then the timer will start. After the 20 minute timer finishes, let the pot vent naturally for 10 minutes and then carefully release the valve to manually release the rest of the steam. Make sure to wear an oven mitt so you don’t burn yourself.

    chicken from instant pot
    Image by author

    Carefully remove the chicken breasts and place on a cutting board or large plate. Let cool slightly, then shred the chicken with two forks and add all the shredded chicken back to the pot. Stir everything really well to coat all the chicken with the tomato broth. Let sit for a minute or two so the chicken can absorb a bit of the broth and then serve.

    Chicken in the instant pot
    Image by author

    Slow Cooker Instructions:

    Place chicken in bottom of a slow cooker. Add the taco seasoning, chicken broth, and can of tomatoes to the pot and gently stir to make sure the chicken is well coated.

    Cook two to three hours on high or four to six hours on low. You want to make sure the chicken reaches an internal temperature of 165 degrees F.

    Remove the chicken from the slow cooker, let cool slightly, and shred on a cutting board. Add the shredded chicken back to the pot and give everything a good stir to mix. Let it sit for a minute to absorb the broth.

    chicken tacos
    Image from author

    Start making tacos! Add some chicken to the tortillas and finish with whatever toppings you like. We love adding chopped red onions, chunks of avocado, a squeeze of lime or a spoonful of salsa, and cilantro and cheese to finish.

    Any leftover chicken can be stored in the refrigerator for up to three days


    Source link